Simple file to facilitate planning of 8×8 LED matrix on MAXIM MAX7219 controlled 8×8 LED display module.
There each 8×8 range simiulate LED matrix. Cells with value 1 are “switched on” – red, and cells with 0 are switched off (background color as applied by the user for whole range).
Switching on/off cells can be done manually, or if you have macros enabled, just by selecting a cell or a range in rows 28:35. Also (as once a cell is selected, it can be selected again only after some other cell or other object was selected), similar action occurs after double click. Two simple event handler procedures (located in a worksheet code) are responsible for that. See the Arduino setup + code and watch it working on YouTube.
Private Sub Worksheet_BeforeDoubleClick(ByVal Target As Range, Cancel As Boolean)
Dim kom As Range
If Not Intersect(Target, Rows("28:35")) Is Nothing Then
  For Each kom In Intersect(Target, Rows("28:35"))
    kom.Value = -Not kom.Value
  Next kom
End If
End Sub

Private Sub Worksheet_SelectionChange(ByVal Target As Range)
Dim kom As Range
If Intersect(Target, Union(Rows(27), Rows(36))) Is Nothing Then
 If Not Intersect(Target, Rows("28:35")) Is Nothing Then
  For Each kom In Intersect(Target, Rows("28:35"))
    kom.Value = (kom.Value + 1) Mod 2
  Next kom
 End If
End If
End Sub
Selection_Change event handler checks first if no cell in row below/above was selected. It allows for easy copying of planned pattern into calculation area – rows 3-10 patterns and below real calculations.
Two key formulas are SUMPRODUCT of a on/of bit and its value in byte (column A):
=SUMPRODUCT(B3:I3,{128,64,32,16,8,4,2,1})
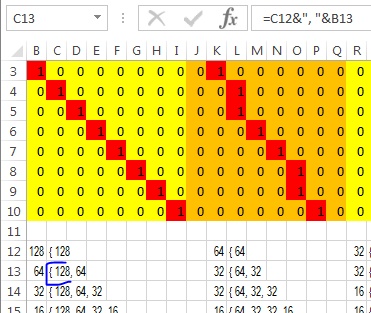
and concatenation of cell above and on the left – see picture.
=C12&", "&B13
Both are copied down and to every 8th column right. Then eventually there is a formula preparing 2D array declaration for Arduino code:
="byte myarray[10[8] = { "&C19&L19&S19&AA19&AI19&AQ19&AY19&BG19&BO19&LEFT(BW19,LEN(BW19)-2)&" }"
After some experiments I decided to go for 20 patterns matrix, but used the same file just preparing first 10 patterns, and then last 10, and combining then in the code.
The file (xls format – if you do not enable macros, you can still use it, just have to change state of a diode by writing 1 or 0 in a cell): 8x8_display_planner.xls
See the whole project on arduino.bucki.pl


One thought on “8×8 display planner”